Introductory Guide to Git with Visual Interface
As a Systems Engineering student, on successive occasions, I came across version control systems (VCS for short), sometimes from subjects related to programming and other in subjects related to software engineering.
Remembering that when I had to learn all these concepts (especially how Git works), I went through several difficulties, I decided to make an introductory guide with basic concepts of Git and how to use it through software with a visual interface.
Personally, I think that to begin with, using a visual interface can be useful and didactic, however, I share the idea that understanding how the tool works from the console is fundamental for a deeper understanding of the concepts.
This tutorial will summarize the main features of a particular software called GitKraken, that I personally think is the best. This guide isn't intended in any way to be exhaustive or detailed in all the functions of GitKraken, it will rather give the user the basic knowledge so that they can use the tool and gradually explore the other features on their own.
At the end of the document some of the advanced features of Git are detailed so that the user can know what those are and what is their purpose.
This guide have independent sections so I leave the table of contents below in case you want to skip to a particular section
- Introduction to Git
- Fork of a repository
- Clone a repository
- 1. Create a repository
- 1 (Alternative). Create a repository
- 2. Complete the necessary information
- 3. Get Repository URL
- 4. We open the window of Clone inside the GitKraken
- 4 (Alternative 1). We open the Clone window inside the GitKraken
- 4 (Alternative 2). We open the Clone window inside the GitKraken
- 5. Paste the URL
- 5. Notification of Success
- Open a repository
- Interface Elements
- Add Changes
- Synchronization with remote repositories
- Working in multiple branches
- Pull Requests
- Additional Features
Introduction to Git
Git is a version control system (VCS) technology, it arises as an alternative to SVN, Hg, and TFS and its original purpose was to control the Linux kernel versions.
Before starting with the specific vocabulary it is necessary to explain why you should (many people would say must) use VCS (git or other).
Problem: When working on a project, files undergo multiple transformations, this is especially noticeable in graphic design and software development projects. As time goes by, it's normal to detect errors and then returning to a previous stage, what is often done to accomplish this is to create periodic backups, however, this approach is impractical in environments with constant changes and increasing number of files, this problem also grows substantially when working in large teams.
Solution: Each VCS proposes a different solution, in the case of Git, when talking about changes, it is meant to be a change at line level, ie. a file changes when one of its lines changes and if several changes are made on the same line, counts as a single change. Likewise, if several lines are changed in the same file, it is considered as many changes as lines were modified. Whenever we talk about changes, we will refer to this definition of change, at a line level. This makes Git extremely useful for text files with multiple lines (such as the source files of a programming language) and little applicable to files that don't follow this format (such as executable files, images, etc.).
Areas in Git
Git works mainly separating the changes into 3 areas:
- Working Area: These are the files you are currently working with.
- Staging Area: These are the next changes that will be saved in the repository.
- Repository: These are the saved files, usually local and on the internet.
Also, to move from one area to another, there are different transitions. To pass from the Working Area to the Staging Area a Stage is made and to pass from the Staging Area to the repository a Commit is made.
Stage vs Commit
The typical process is as follows: the user works with their files in the Working Area, once he has finished the desired changes, he can select exactly which changes he wants to add to the repository, these changes are chosen and "moved" to the Staging Area (the term move in this case is misleading because in the local system the files do not undergo any modification). Once all the changes have been moved to the Staging Area you can make a commit, the commit basically consists of "packing everything that is in the Staging Area, associating a title and a description and uploading it to the repository".
At first this way of working could give the impression that the Staging Area does not fulfill any function, however it is especially relevant when one wants to make a commit with a subset of all the changes made, for example, if changes were made in the graphical interface and in the database but one wants each "package of changes" to be in a different commit, for that, first, the user would move to the Staging Area the changes related to the database, then they would make the commit and finally they would repeat the process with the changes related to graphical interface.
NOTE: The user is not required to commit all the changes.
WARNING: One could move to the Staging Area only a subset of the modified lines in a file, that's why it's important to remember that the term "change" refers to lines and not to files.
Once the commit is made, the changes are definitively saved in the repository, the repository always exists at a local level on the user's machine and additionally, a copy is usually used remotely in some online provider, the most common are GitHub, Gitlab and Bitbucket.
Remote Repositories
When you work with a remote repository, three important terms arise: Pull, Push, Clone. As the names suggest, Pull brings the changes from the remote repository and applies them to the local repository, Push uploads the changes from the local repository to the remote repository and Clone, on the other hand, copies the remote repository and creates a local one, this operation is only done once (not to be confused with Fork).
Fork vs Clone: A Fork is an independent copy of a repository. When one makes a Clone, one intends to work in their local computer and then upload the changes to the original repository, when one makes a Fork one intends to make a custom variant and become independent (to a certain extent) from the original repository. Making a Fork replaces the process of creating the repository and to do so one must go to the original repository.
NOTE: As long as the changes do not overlap (i.e. two users have not modified the same line), the same Git system takes care of combining them. When two or more users modify the same line of the same file, a "Conflict Resolution" is necessary. It is an advanced topic however it can be required daily in environments with multiple programmers, those who use git as the only users should not worry about this aspect.
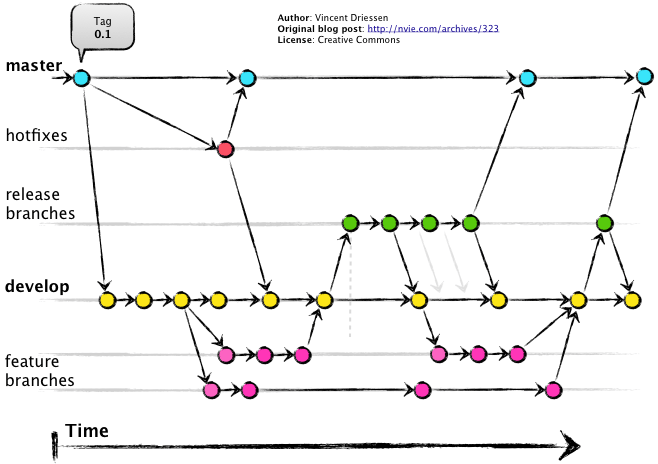
Branches
The last important concept is the branches, this is the key concept of Git, within a repository one can have multiple branches, each branch allows to have an independent Working Area, this is done to keep the changes isolated, although the Stage-Commit process is the same as the one mentioned above, one may want to experiment with a new feature but without risking the rest of the codebase that already works correctly. In the case the experimentation is successful, it can be joined (merge) to the main branch. There are multiple criteria for the creation of branches, some organizations use a branch by features, others a branch by developers, etc. The way to use the branches is usually called "Git Strategy" or "Git Workflow", is considered good practice to have a simplified scheme with the following branches:
- Master: Where you have the code of the latest stable version
- Release: Where all the changes that will be in the next version are concentrated and the final tests are carried out.
- Develop: Where you have experimental code that is still being tested
- Hot Fix: Where errors detected a posteriori are repaired (outside the tests)
- Features: An independent branch for each feature you want to add to the software.
This can be visualized much better in an image. Each arrow indicates a merge operation.
Additional Software
Git is a command line application (CLI), however, there are multiple softwares with a graphical interface built on top of this console application. In this case, we are going to talk about how to use one of the most popular: GitKraken.
For the sake of simplicity, it is assumed that the user has correctly installed the Gitkraken software and that it is ready to use, therefore no initial installation and configuration steps are detailed.
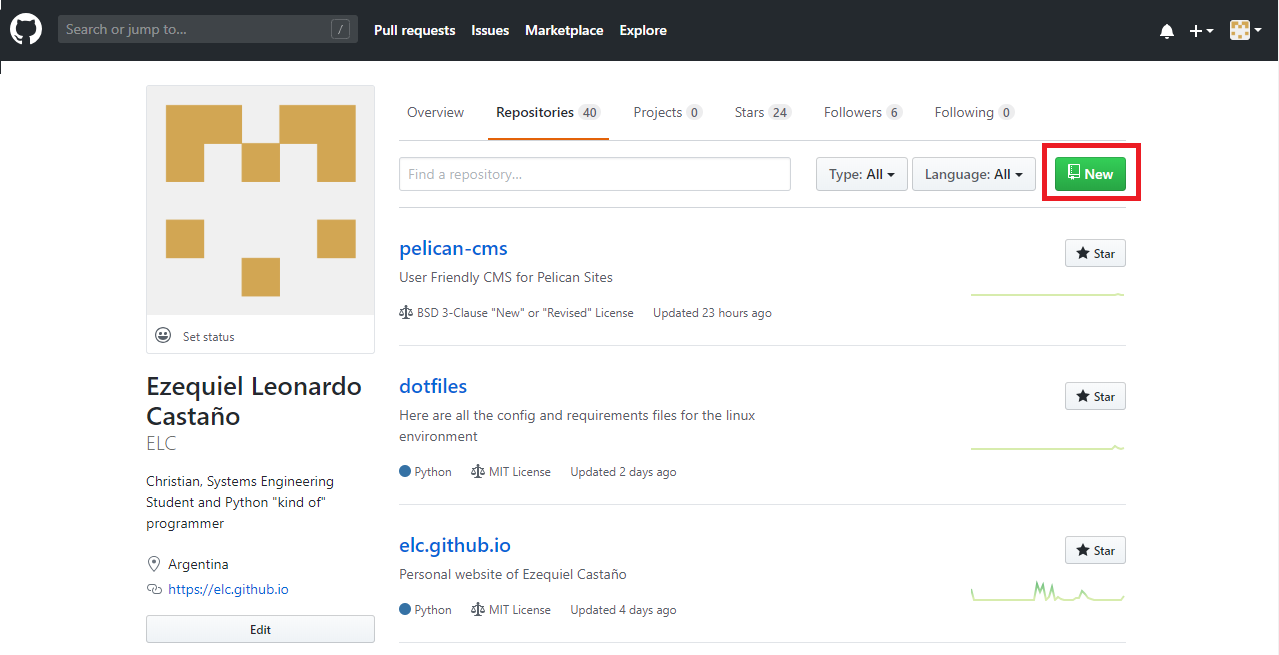
Fork of a repository
As mentioned, a fork is a stand-alone copy of a repository. The repository already has its own creator and history of branches and commits but one makes a separated copy. This procedure can vary from one remote repository provider to another, here is the procedure for doing this in Github
1. Find the original repository
First, we look in Github the repository from which the Fork is wanted, in this case, the Manim repository will be used, the animation engine created by 3Blue1Brown.
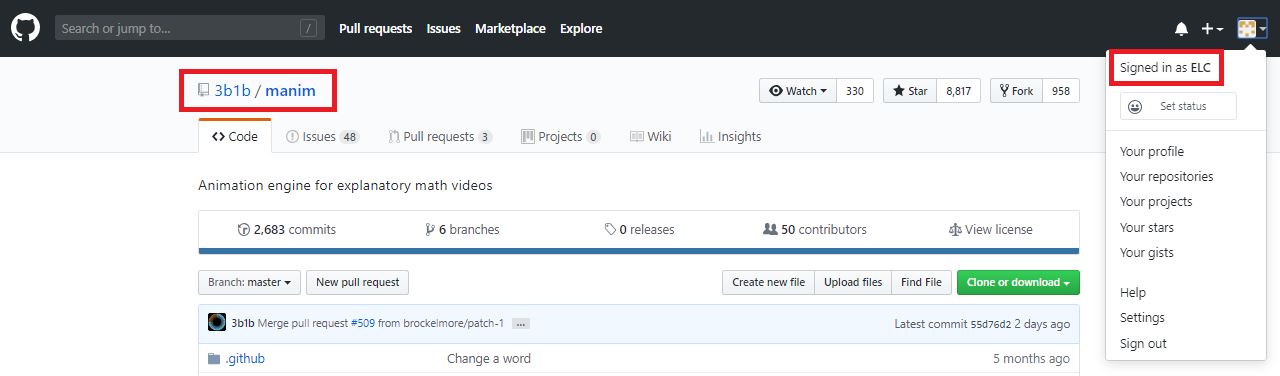
As you can see in the image, the repository creator is 3b1b and the currently logged user is ELC so the owner and the creator are different users.
2. Perform Fork
To make a fork, simply click on the Fork button at the top.

Immediately afterward, GitHub will redirect us to a screen that tells us that the Fork is being created.

Once the process is finished, a repository of the same name will be created in the logged user account.

As you can see in the image above, the repository now belongs to ELC, with a small label below that indicates that the repository is a Fork. A sign that this repository is independent and belongs to the logged user is that there is a new section "Settings" that otherwise would not appear.
NOTE: This section may appear if you are a contributor to the repository, however that feature may vary from provider to provider and will not be detailed in this guide.
One last confirmation could be the Forks count which is a common number for all Forks.
From now on the evolution of this new repository can be completely independent of the original.
IMPORTANT:What is the difference between making a fork and creating an identical repository with the same files? When doing a Fork you have a common commit history with the original repository, so it is possible to combine new changes from the original to any of the Forks (merge) and from the Forks back to the original (Pull Request).
The alternative procedure of creating a repository from scratch as well as cloning from GitKraken is detailed in the following section
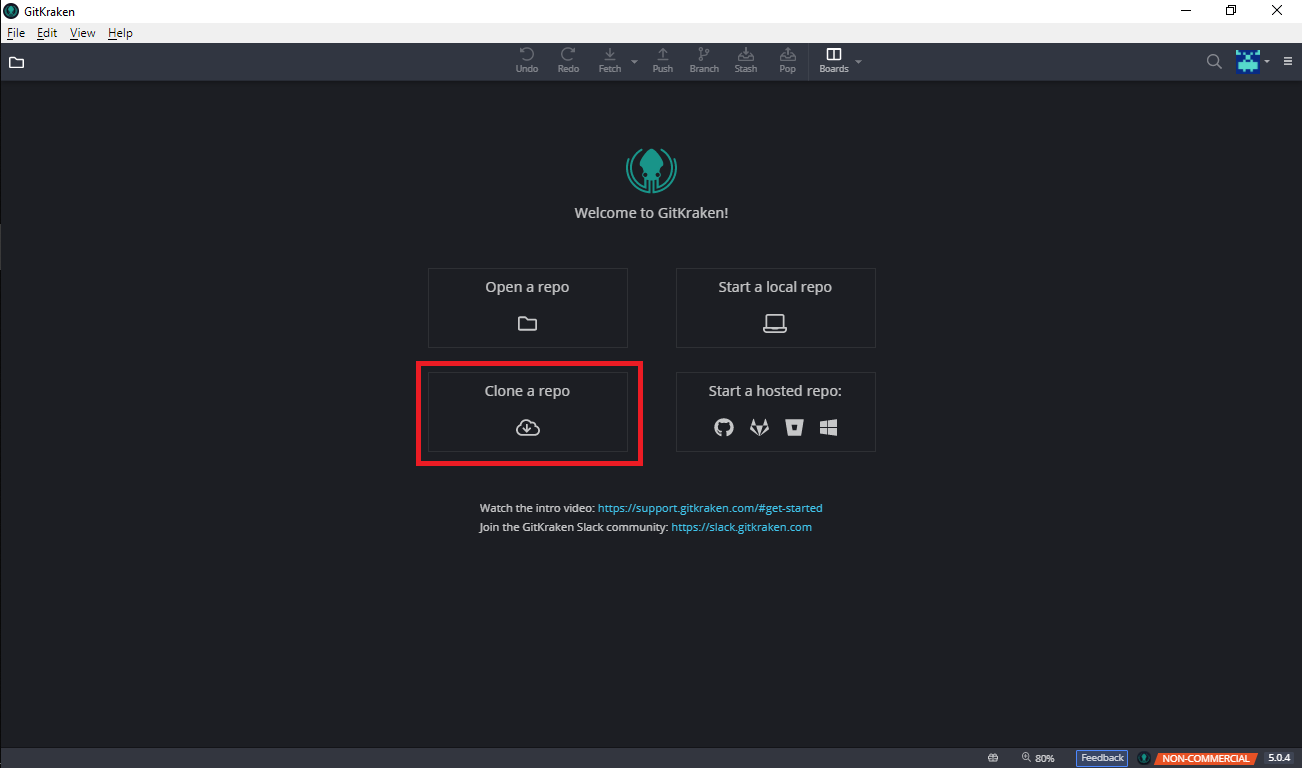
Clone a repository
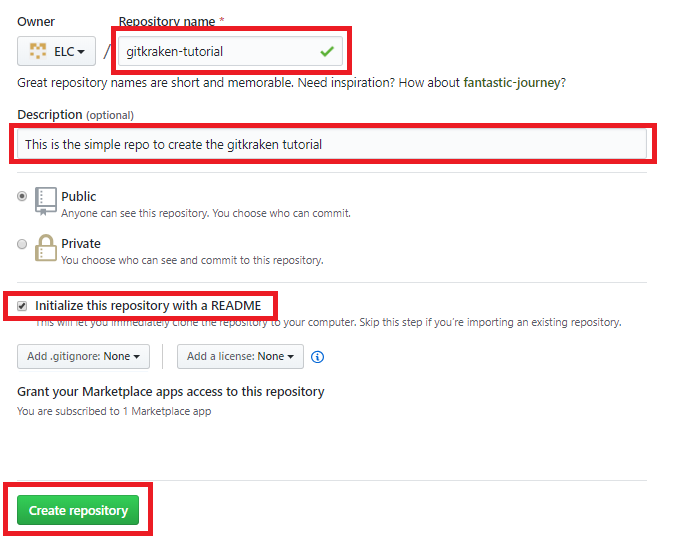
The most traditional approach is to first create the repository on the remote server (Github or similar) and then clone it. In this case, we are going to create a repository called "gitkraken-tutorial" in Github.
1. Create a repository
This can be done from the Github homepage.
1 (Alternative). Create a repository
Or from the repository section.
2. Complete the necessary information
IMPORTANT: In order to clone, our repository must be "Initialized" therefore, it is essential to check the option "Initialize this repository with a README". The gitignore options allow git to ignore certain files (temporary files, caches, etc.) and the license allows you to choose a standard license from a list.
3. Get Repository URL
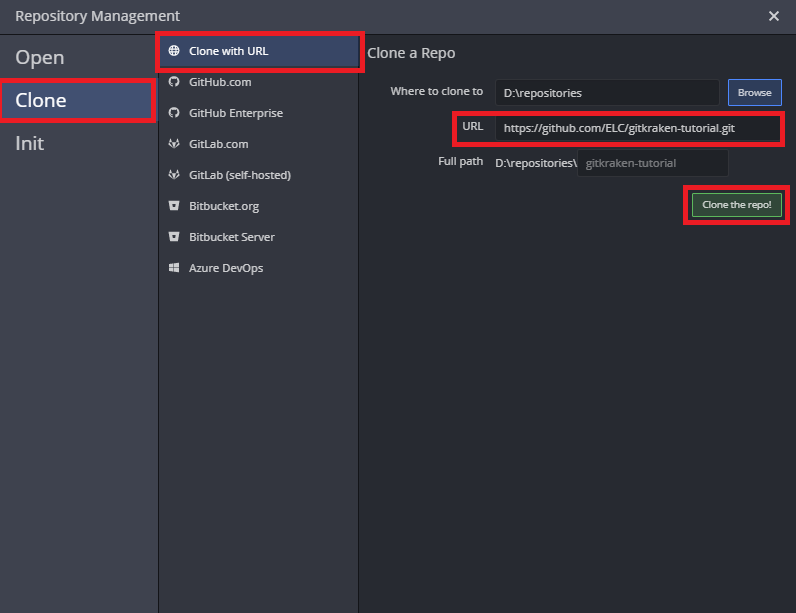
Two perspectives can be used to clone the repository from GitKraken:
- Linking GitHub's account with Gitkraken's account
- Use the repository URL
All git repository services attach a public URL to the repository, so this approach will be taken because it is common to all providers.
Once you follow the steps in the images, the URL will be copied to the clipboard.


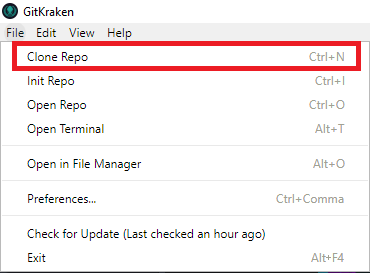
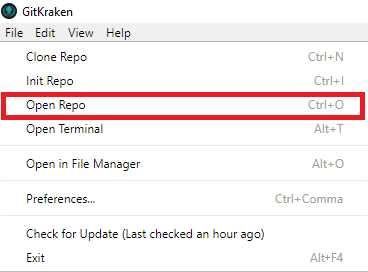
4. Open the window of Clone inside the GitKraken
In the File menu, select the option "Clone Repo".
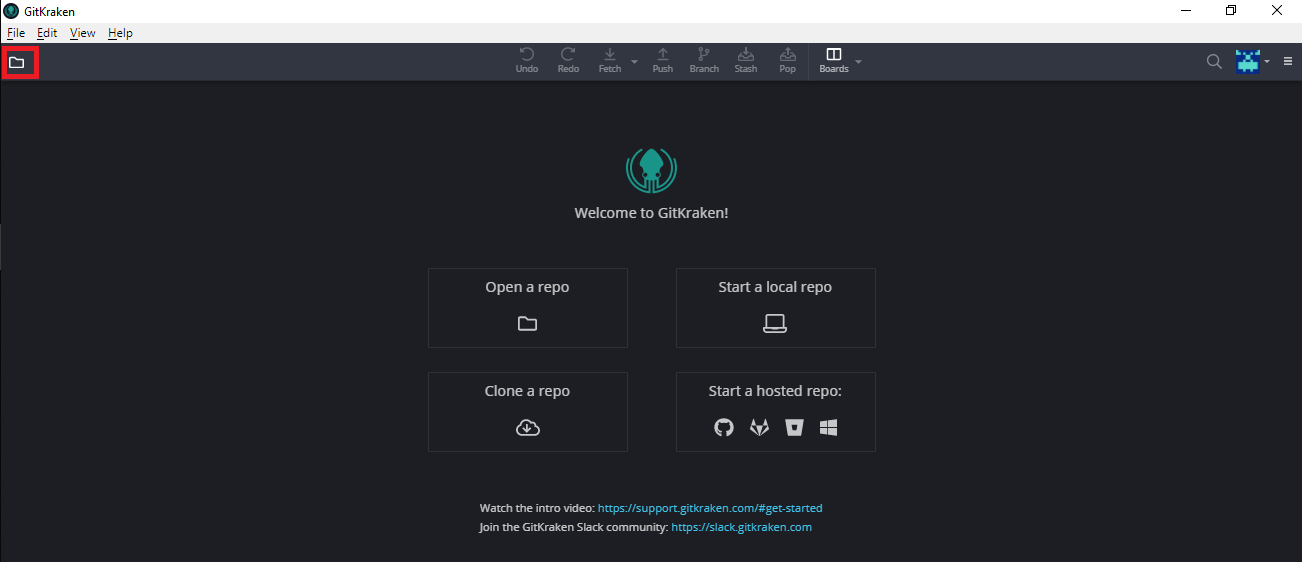
4 (Alternative 1). Open the Clone window inside the GitKraken
At any time, you can use the button located in the upper left corner.
Then choose the Clone option.

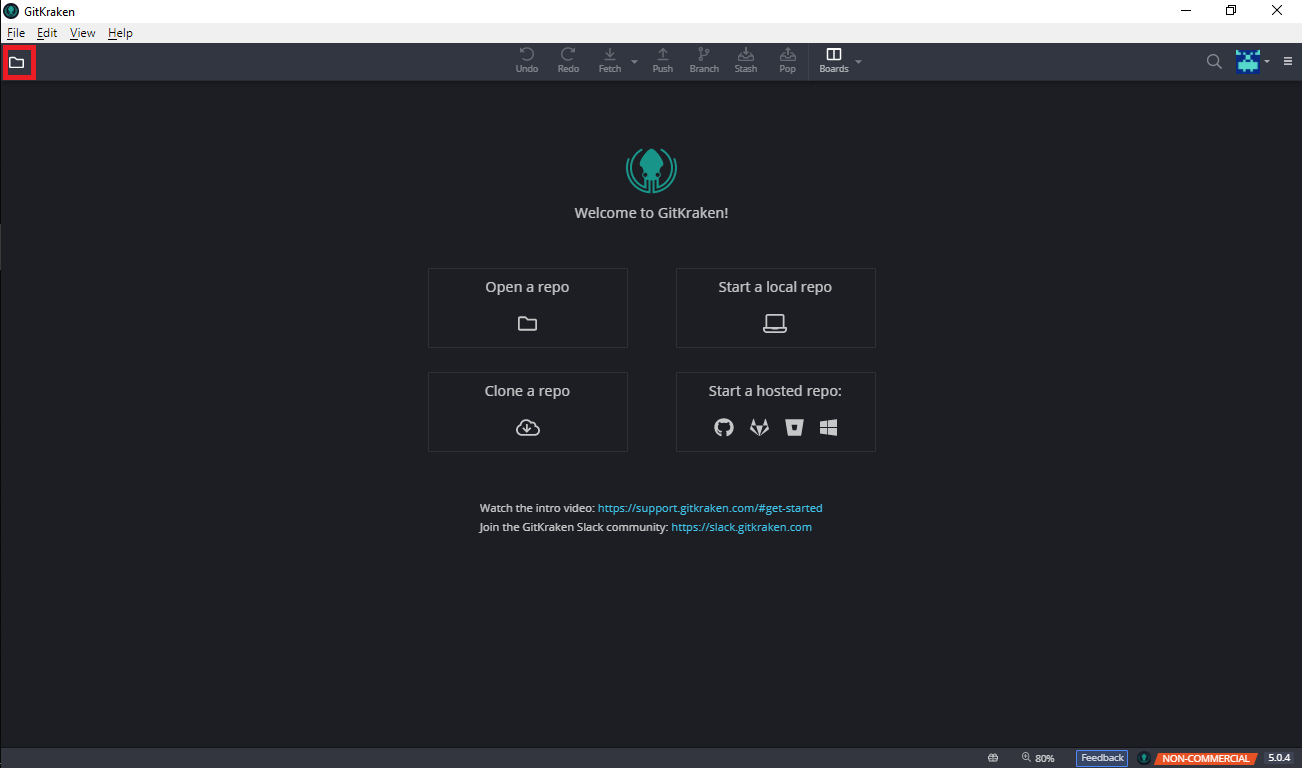
4 (Alternative 2). Open the Clone window inside the GitKraken
If no repository is open, the menu can be accessed directly from the home screen.
5. Paste the URL
Additionally, you can detail the path where the repository will be cloned and change the name of the destination folder. It is recommended to have a "Repositories" folder and clone all repositories there.
5. Notification of Success
Once the repository has been cloned, a notification should appear at the top saying that the operation was successful. One can use the "Open Now" button to open the repository immediately. In this case, it will not be done to illustrate how to open a repository from scratch.

Open a repository
Once the repository has been cloned, it is necessary to open it in order to start working.
NOTE: The repository could have been initialized instead of cloned but this scenario is unlikely as a link to the remote repository should then be made. As the approach outlined at the beginning is generally used, initialization of repositories is beyond the scope of this guide.
1. Open Window
In the File menu, select the option "Open Repo".
1 (Alternative 1). Open Window
In addition, the icon in the upper left corner can be used.
1 (Alternative 2). Open Window
If no repository is opened, you can use the start screen button.

2. Select the repository
"Open a Repository" is selected.

3. Select the folder
Navigate to the folder where the repository is located, an easy way to identify it is that you should see a folder called ".git" (This folder may not appear if you do not have Windows hidden files enabled).

Interface Elements
Basic interface
When opening a repository we will find the basic interface.

Commits and Branches Tree
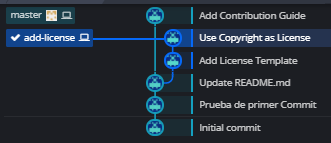
When having several commits and branches, in the central part, it is possible to see the bifurcations and the unions, in the following image is shown a project with several branches (Only as an example).

Add Changes
Git tools can be separated into two categories:
- Integrated with IDEs
- Decoupled
Many IDEs come with their own integration with Git, some examples of this are Eclipse, Visual Studio and PyCharm. However, it is possible to use completely decoupled applications such as Gitkraken, Github Desktop or the git CLI itself.
The former have the advantage that the user does not have to leave the application in which he develops the code and tests, but has the disadvantage that he can easily confuse which is his current branch and if the system is in a consistent state, in addition, each IDE will have its special interface, and the IDE tend to change if the programming language is changed. On the other hand, decoupled tools such as Gitkraken allow the developer to use the IDE only for what was designed, programming, debugging and testing, abstracting completely from the version control system, this approach has the advantage that the user only has to worry about version control when starting to work and when making the Stage-Commit and that the same interface is used regardless of which IDE has been used, but brings as a disadvantage that you must have additional software installed.
When using Gitkraken it is possible to work as usual in the traditional IDE and when you want to add changes to the repository what will appear is something like the following:

The acronym WIP (Work in Progress) refers to the Working Area. By clicking on this box you can see on the right side the changes made separated by files and also a clear division between the Working Area and the Staging Area.
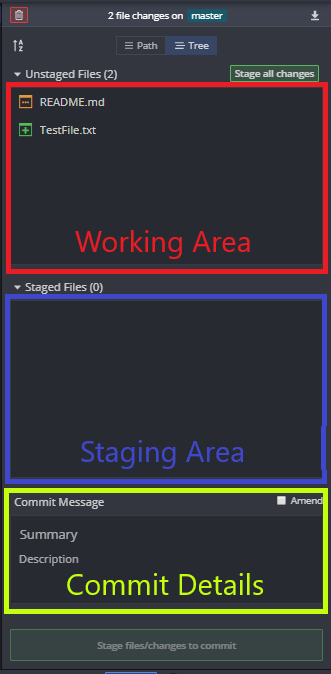
It is also important to clarify the function of three buttons:
- Trash basket in the upper right corner: DELETEs all changes to the Working Area, use only if you know what you are doing.
- Tree: Allows to visualize the files in the form of a tree of directories, depending on the configuration may not be selected by default, it is recommended to use it.
- Stage Files/changes to commit: Generates a commit with the given title and description of all changes that are in the Staging Area.


If you click on any of the files in both the Working and Staging Area, you can see a detail of the changes:

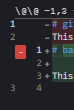
Each line shaded with red implies that that line was in the last version and will be removed, the green shaded indicate that they were not in the last version and will be added. In Git there is no concept of modifying a line so if a modification is made, the line from the previous version will be deleted and an identical one will be added but with the changes made.
If one hovers the cursor over one of these lines, a button with a plus sign (+) will appear that will allow us to move individual lines to the Staging Area:

Gitkraken, in turn, identifies changes by sections in files and allows several sections to be added to the Staging Area.

Finally, if you want to add all the changes of a file to the Staging Area, you can position the cursor over that file and use the "Stage File" button that will appear. It is also possible to move ALL files from the Working Area to the Staging Area with the "Stage all Changes" button:

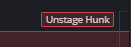
The process to remove changes from the Staging Area and pass them to the Working Area is identical, only the corresponding file must be selected first from the Staging Area, in this case the buttons are red and the button with the plus (+) becomes a minus (-):

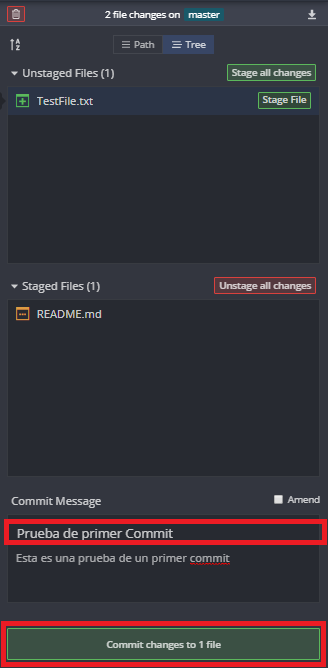
Once you have moved the desired changes to the Staging Area, you can create the desired commit, you need to assign it a title, you can also detail an optional description:
Once the commit is done, it will appear in the main screen with the name assigned to it:
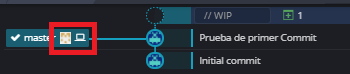
It is important to note that this generates the commit in the LOCAL repository and that these changes have not yet impacted the remote repository, Gitkraken shows us this by using a computer for the Local repository and the Github user logo to represent the remote repository. In the next section, we will see how to synchronize both repositories.
Synchronization with remote repositories
As mentioned before, to keep two repositories up to date you need to use the Pull and Push actions
Download changes from the remote repository
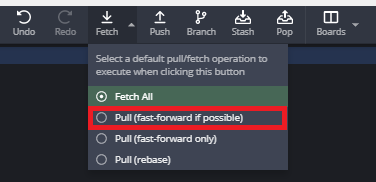
It is considered a good practice to always pull before uploading changes, this will bring any changes that we could not have in our local machine. In this opportunity, we will have to distinguish between the Pull action and the Fetch action.
- Fetch: Check if there are changes in the remote repository and shows us what is the status of the remote with respect to the local
- Pull: Makes a Fetch and applies those changes to the local repository.
Fetch is, therefore, a completely safe action, while Pull can bring changes that generate collisions with ours, although this is not frequent and is only possible in environments with multiple users, it is considered a good practice that the user resolves conflicts on his local computer and then can upload the changes. Otherwise, the remote repository could be left in an inconsistent state, halting the progress of other team members.
In the Gitkraken action bar we have the Fetch action:

To access the Pull action, choose the arrow next to Fetch:

In the case of the example repository, the Pull should be successful as there were no changes in the remote repository.
Upload changes to the remote repository
To upload changes it is necessary to first perform a Pull to resolve conflicts (if any) once resolved, you can perform a Push using the associated button in the action bar:

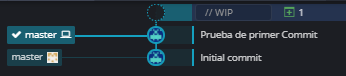
Once done, the easiest way to verify that it was successful is to see the commits tree.
This time both the Github user logo and the computer are together, showing that the content is synchronized.
Example of Fetch and Pull
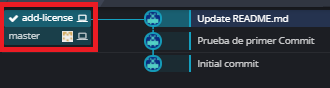
To illustrate what a reverse situation would look like (changes were made to the remote repository and we want to download them). First, we do Fetch and we'll see something like this:
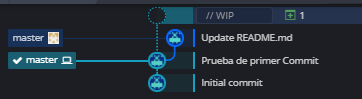
As you can see, the branch master is "advanced" and has a commit called "Update README.md" that is only in the remote repository (evidenced by the Github account logo). And our local version is "behind". In this situation we have to evaluate the changes and if there are any conflicts (including the Working Area files). It is recommended not to have anything in the Working Area at the time of Pulling, that is, that all changes are already inside commits, this simplifies the process and decreases the probability of finding conflicts.
NOTE: There are advanced situations where you can temporarily save Working Area changes in a Stash but this feature is outside the scope of this guide.
In case there are no conflicts, a Pull can be performed without problems:

The result is as expected, both the local and remote repositories are synchronized.
Working in multiple branches
Once you can work efficiently on one branch, it is highly recommended to select one Git Strategy and use multiple branches.
Create Branch
To create a branch we must first position ourselves in a base branch, this is the branch from which the new branch will bifurcate.
NOTE: There is the concept of orphan branches, which are branches that are not derived from any other branch. However, their use is usually very particular and specific and they are therefore beyond the scope of this guide.
In this case, we will create a master branch, add two commits, join it and then delete it.
In the first place, we position ourselves in master, double-clicking in "master".
Then use the Branch button on the action bar.

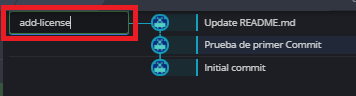
Then write the name of the branch and press enter:
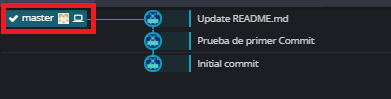
Gitkraken allows us to see in several places that the branch was successfully created.
However, it is possible to observe that in the commits tree that the master branch does not appear, this is because it is hidden in the +1 icon:
When passing the cursor over it we can see that the branch is visible again:
This simplification of the interface is due to the fact that the content of both branches is identical (we haven't made any changes yet) and although it can be a little confusing for beginners, it is extremely useful when you have multiple branches. On the other hand, GitKraken's visual aid allows us to observe that the "add-license" branch only exists in the local context and does not yet exist in the remote repository.
Join Branches (Merge)
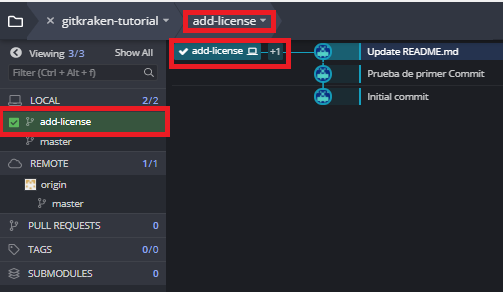
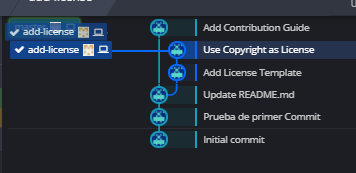
In order to join two branches it is necessary that they are different, for it some commits are added to the branch "add-license". After adding the commits, you get something like the following:

While the branch still exists only in the local context, it is important to see how it is "ahead" of the master branch. Although in the scheme presented at the beginning the branches are arranged parallel to each other, Gitkraken only arranges them that way when there are several changes, that is, only when the master branch has been modified and that this modification is not one of the commits of the branch with which it is aligned (add-license) in this case. To illustrate this example, a change will be added to the master branch directly (not in the add-license branch).
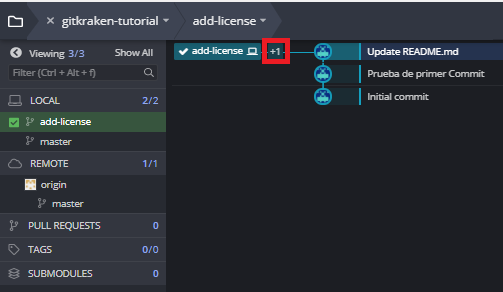
This way of visualizing branches is more similar to the previous view, the view changed because the commit "Add Contribution Guide" was added directly in the master.
Before joining the branches we are going to make a Push, in this case, as the branch does not exist in the remote repository, it will ask us if we want to link it with some branch of the already existing remote repository, if we leave the space blank and click on Submit, it will create a branch with the same name in the remote repository.

Now both branches are synchronized with the remote repository:

While it was not necessary to make a Push of the branch before joining it, it is considered good practice to make the history of changes public so other users can see who made the changes and how.
To merge branches one must click on the name of the source branch and drag and drop on the name of the destination branch, this will display the following menu, where we select the Merge option.

Once the option is chosen, the commits and branches tree will look similar to the next one:

As you can see the merge was successful, however, it will not yet be reflected in the remote repository, therefore, it is necessary to activate the master repository (by double-clicking on the name) and then do a Push.
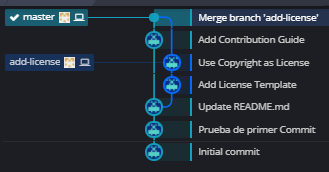
Once the Push is done, both the branches and the Merge operation are synchronized in the remote and local repository.
Erase Branch
Throughout the life of a development project can be created infinity of branches, therefore, to keep the interface clean, it is a good practice to remove the branches after they joined (merge) to master (or to the branch that corresponds according to the Git Workflow established).
To remove a branch just right click on the name and select the option that removes it from both the local and remote repositories.

GitKraken will warn us that this is a destructive operation and can not be undone, select Delete

Once the branch has been successfully removed the commits and branches tree will look similar to the next one:

As you can see, the deleted branch is neither in the local nor in the remote repository, however, and this is where the utility is, it can be clearly seen as it once existed and consisted of two commits that were then attached to the master. The advantage of this functionality is that one can remove the branches and not lose the history of what was done, having a separation in the commits that allows you to easily track who made what changes and how they were made. This wouldn't be possible (or rather, it would be much more complex) if you only worked with the master branch.
Pull Requests
In a development environment, it is rare for developers to perform merge to master directly, which is why an approval and review mechanism is used before merge can be performed on critical branches. Each provider calls that process differently, in the most popular (Github) that process is called Pull Request.
A Pull Request is basically the following: I have changes made and would like to attach them to this branch. It is a common practice in the most critical branches within development projects, where the person in charge of those reviews and approvals is usually called Release Manager and is also extremely popular in Open Source projects, where you have the main repository and people who want to contribute, not having permissions to edit the repository directly, can make Pull Requests. The creator of the repository will then be able to accept or reject them.
Although Pull Requests are usually done through the provider's interface (Github in this case). They can also be done from GitKraken.
The procedure is shown for illustrative purposes only:
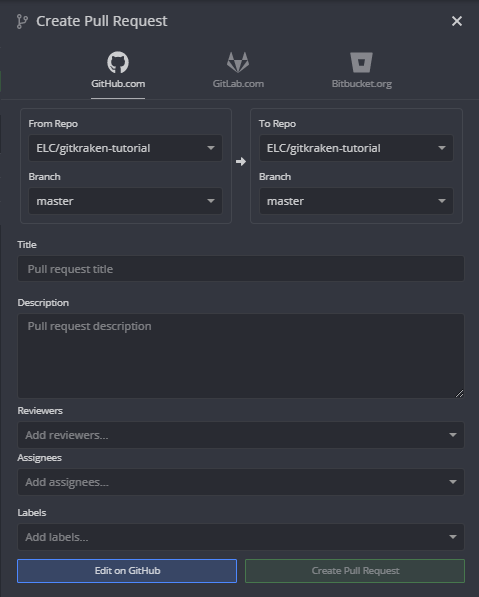
- Right click on the branch from which you want to make the Pull Request
- The Pull Request option is selected
- The requested fields are completed

NOTE: Pull Requests must generally be made in a specific way that is detailed in the same repository of the software to which one wants to contribute to the example shown is trivial, only to have a notion of how the procedure would be.
Additional Features
Apart from everything mentioned in this guide, there is still a lot of ground to explore both in what Git allows and what can be done with GitKraken, some of these possibilities are listed below for the reader to investigate in more detail if desired
- Have repositories within repositories. Search: Submodules and Subtree
- Apply only one commit from one branch to another and not make a history union. Search: Cherry Pick Commit
- Have branches completely independent of others: Search: Orphan Branch
- Unify branches forgetting history. Search: Rebase
- Add content to a previous commit. Search: Amend
- Undo several commits while keeping the changes. Search: Soft Reset
- Force changes in the remote repository. Search: Push Force
- Revert changes of a specific commit. Search: Revert
- Save changes to the Working Area in a temporary space. Search: Stash
- Create tags to identify specific versions of the entire repository when it is in a consistent state (baseline). Search: Tags
Some of the above features can only be done from the console, i.e. they are not fully supported in GitKraken.
Aditional Resources
- GitKraken Official Website
- Git Official Website
- Git Console Sandbox: It allows to experiment with several git console commands in a sandbox environment inside the browser.
- Awesome Git: A curated list of amazingly awesome Git tools, resources and shiny things.