Secure Live Collaboration in Jupyter Lab
The single most requested feature for Jupyter Notebooks/Lab was live collaboration á la Google Docs. Today, this is possible but should be done with caution, since it gives access to the whole internet to run any (including malicious) code on our local PC. This is a quick guide to prevent this by implementing several layers of security.
Collaborative Notebooks
There are many ways to work collaboratively, however not all are suitable for every scenario. In the case of Jupyter Notebooks, there are three main types of collaboration, the last of which has been introduced recently.
- Asincronous Multiuser: each party makes changes and then changes are merged. This is git-like collaboration and is possible with Jupyter Notebooks out of the box.
- Non-Concurrent Multiuser: Several users make changes at the same time but not in the same files. This is currently possible when using Jupyter-Hub (or MyBinder) servers. There might be synchronization issues if modifying the same file.
- Concurrent Multiuser: Several users make changes at the same time in any document (even the same one) and the changes are merged without overlapping. This is the Google Docs style and is the new feature of Jupyter. Hereafter this is the type of collaboration that will be referred to as live collaboration
Why should we work collaboratively?
Working collaboratively has definite some advantages, one way to show them is by some example use cases that would not be possible without this feature:
- A teacher can invite their students to actively collaborate on a notebook and write comments and questions in a centralized way.
- A small team can leverage a server (or powerful computer) to run the notebooks instead of each having to run the kernels on their local PCs.
- Two team members can work in different parts of the same problem, like hyperparameter tuning and data visualization concurrently.
- A presenter can invite a small audience to try some Jupyter app (e.g. built with widgets) and have them use it with zero-install.
Of course, this is probably not the best solution for all possible scenarios but for small teams, mentoring / teaching and showing proof of concepts, it might be worthwhile.
The results are illustrated in the following video
Risks involved
Before enabling live collaboration, it is important to understand the risks it implies. Therefore three different use cases will be illustrated:
- Host a Jupyter Notebook on the local PC and work together with someone in the same local network (LAN or VPN)
- Host a Jupyter Notebook on the local PC and work together with someone outside of the local network (any PC with internet access)
- Host a Jupyter Notebook on a remote PC and work together with someone outside the local network
The first is mostly secure (as long as the local network can be trusted). However, when giving access to the whole internet (the second option), some security measures should be taken. The third case is too vaguely described to be explained in detail since the steps might change for servers behind a reverse proxy, servers in the cloud, or servers on-premises, furthermore, some servers require specific firewall changes. For on-home, on-premise servers steps should be similar to what is described for the second case.
Quick Solution
This article covers some of the technical details and implications of each of the steps. It is recommended to read the full article but for those who already had and/or want a quick solution, refer to the 4-command-summary at the end.
Important Disclaimer
This article assumes you have full control of the PC you are going to use, I highly recommend against using these guide on any company-owned hardware to avoid introducing security risks and/or going against the company's policies.
Moreover, I am not a security expert so I strongly recommend the reader to make their research and validate everything here written because fine details might be overlooked.
Finally, take into consideration that this tutorial is OPENING A BACKDOOR for your PC so, one can never have too many security measures. If this makes you feel uneasy, do all your experiments inside a sandbox (like a container or a virtual machine).
To further illustrate this, Ribaka Nazmara showed in Quora some dangerous yet simple code a malicious user might run:
Fill up disk:
import os

while True:
    os.fork()
Delete all files:
import os

os.system("rm -rf /")
Crash the system:
import os
os.system("%0|%0")
From Python, one can even run processes in the background with the subprocess
module. These examples should illustrate why not using adequate security
measures might result in disastrous outcomes.
Requirements
This tutorial requires Jupyter Lab 3.1.0 or newer and NGrok (for the second use case).
If ngrok is not installed, all the steps are explained in this 5 minute tutorial by CalmCode.
In the case of Jupyter Lab, the version required was released on the 27th of July 2021 so if Jupyterlab was not installed recently, an update will be needed.
To check your Jupyter Lab version simply run:
jupyter lab --version
Jupyter Lab Update Instructions
If using Anaconda, run:
conda update anaconda
conda update jupyterlab
For traditional pip installations, run:
pip install jupyterlab>=3.1.0
Use Case 1: Collaborative work inside LAN or VPN
Once Jupyterlab 3.1.0 or newer is installed, it is possible to enable the collaborative feature by running:
jupyter lab --collaborative
This will create a normal session available at http://localhost:8888. However, this URL is only accessible inside your local network. To access from another device (PC or Mobile) one should replace the "localhost" with the private IP address, also known as internal IP. The IP address is a network address and is not attached to specific hardware (as the MAC address), which means that each time the PC is turned on, it might have a different private IP.
To know your private IP simply run this command in a terminal
On Linux/Mac:
ifconfig -a
On Windows:
ipconfig
Private IPs are the ones following these formats:
- Class A: from 10.0.0.0 to 10.255.255.255
- Class B: from 172.16.0.0 to 172.31.255.255
- Class C: from 192.168.0.0 to 192.168.255.255
The "Default Gateway" IP is the one for your router or networking device whereas the other one (Ethernet, IPv4, or similar) is the one of the PC.
For example, if the PC's IP address is 192.168.1.35 any person connected to the same network could access the Jupyter session by navigating to the URL http://192.168.1.35:8888 in the browser. Note: This required that the port 8888 is open in the firewall of the PC running Jupyter.
By default, Jupyter uses Token Authentication which is transparently applied for the local PC, meaning that incoming connections from other PCs will be rejected or they will be asked to provide a token.
Tokens are difficult to share and remember as they are long strings of seemingly random text, that is why they will be replaced with a user-defined password.
First Layer of Security: Jupyter Password
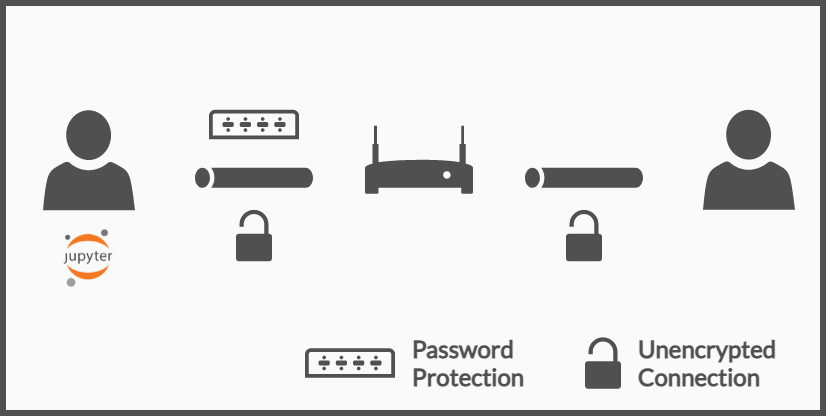
The Jupyter CLI provides a straightforward way to set a global password by running:
jupyter lab --generate-config
jupyter lab password
The first command generates a default config file, if already run before, it can be omitted. The second one will prompt the user to write a password and then confirm it. Note: when writing the password, no characters (not even "*") will be shown, this is done so that the number of characters of the password is kept secret, this is common practice in Linux Systems but may be new for some users.
Continuing the previous example, when a user from another PC enters the http://localhost:8888, it can access by writing the pre-defined password.
If configured correctly, the next time Jupyter is run, it will prompt for the password:

Technical Details: The password is stored as a hashed in the configuration file, so it is not stored as plain-text anywhere in the system and is a global setting for all Jupyter Lab sessions (Jupyter Notebook sessions are not affected).
Important Note: Always refer to the Official Docs in case some of the information presented here changes.
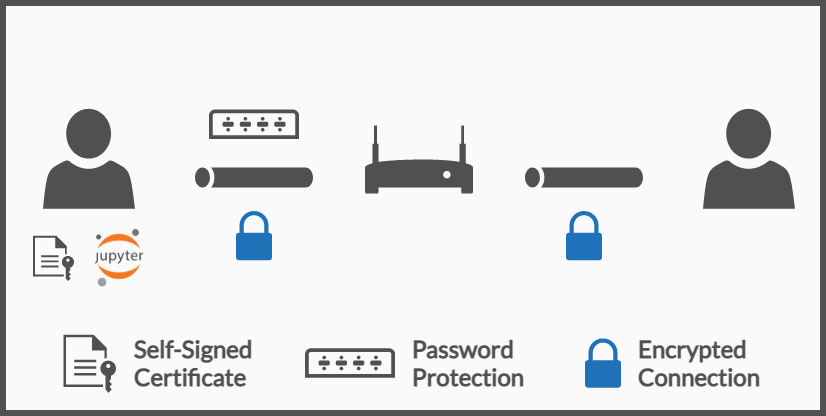
Second Layer of Security: Local TLS Encryption
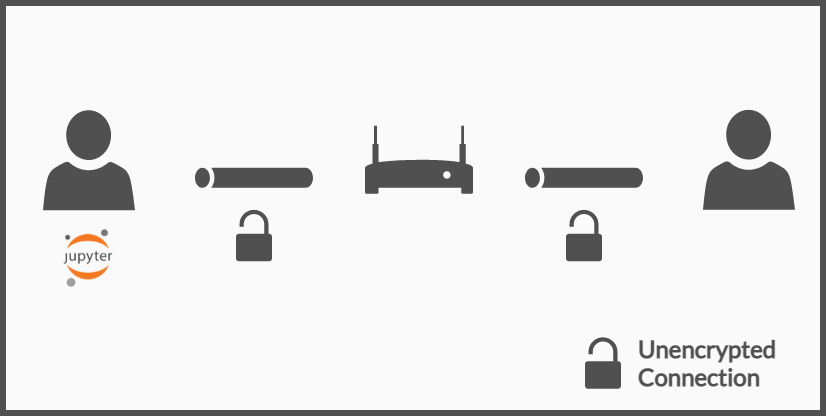
Even having configured a password, the connection is not encrypted, which means that, inside the local network, the password travels as plain text through the network and thus is susceptible to man-in-the-middle attacks.

If you trust your VPN or local network, this step is optional. Nevertheless, this is mandatory when using public networks (cafés, airports, etc.).
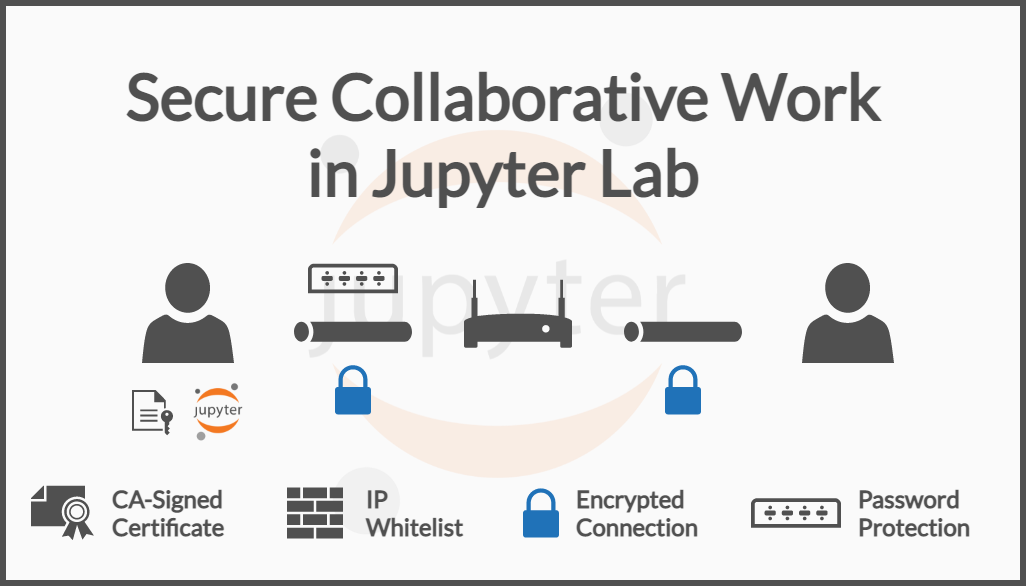
To prevent this from happening, a protocol with encryption (like HTTPS) should be used. HTTPS is the most common approach, it uses TLS encryption so all the data sent between two nodes is encrypted, which of course includes the password that would have otherwise traveled as plain text.
Explaining how certificates (the key component of TLS encryption) work is beyond the scope of this article. Nonetheless, one can set up quite easily a self-signed certificate, the browser will show a warning saying the connection might be insecure but that is simply because the certificate does not come from a Certificate Authority, a company that is trusted to emit valid and trustworthy certificates. Instead, the certificate is emitted by the user in the local PC is not suitable for any production environment but is more enough for this use case.
To generate this certificate the simplest way is to use OpenSSL which is already installed if using Anaconda. In case Anaconda is not installed, OpenSSL should be installed independently. Using Anaconda is however the easiest way for Windows users.
Once OpenSSL is installed, navigate to the folder where Jupyter will be started and run:
openssl req -x509 -nodes -days 365 -newkey rsa:2048 -keyout mykey.key -out mycert.pem
Note: if the error: "Can't open {some_path}ssl/openssl.cnf for reading, No such file or directory" is thrown, see the next section to configure it using Anaconda.
Once run, it will generate two files, the mykey.key, and the mycert.pem, none of which should be added to source control. These two files will enable the Jupyter server to use HTTPS for its connections, to do so, run the following command:
jupyter lab --collaborative --certfile=mycert.pem --keyfile mykey.key
This setup should suffice but, the user should be instructed to use https://localhost:8888 (with HTTPS) explicitly because there might not be an automatic redirection to HTTPS if using HTTP. The browser might show a warning as described earlier but this should be ignored and continue anyways.

To remove the browser warning one should add the local certificate to the truststore, that, however, is beyond the scope of this article.
With the previous configuration the connection between the PC running Jupyter and the other PC is encrypted, even inside the Local Network / VPN.
Note: so far, the whole connection is done through the local network and should not be visible from outside, but in public networks, this might be different. The good practice is to never trust a public network, with the password and this connection encryption a decent level of security is achieved for local connections / VPN only.
In the following sections, this will be expanded to cover users from other networks (i.e. internet). Hence additional security measures should be taken.
Config file Missing
The configuration file for OpenSSL is not configured by default therefore one has to run:
set OPENSSL_CONF={AnacondaPath}/pkgs/openssl-1.1.1k-{some_hash}/Library/ssl/openssl.cnf
Use Case 2: Collaborative work outside the local network
It is not the most common to have multiple users in the same local network, for those cases, one should establish a connection with someone through the internet. By doing so, the local PC is open to anyone with enough knowledge to hack and get themselves in.
There is no way to guarantee 100% that no one unintended will be granted access, there are some measures one could take against though.
The first layer of security described above is a must, having at least password-protection is the bare minimum when connecting through the internet.
Moreover, in this section, several additional layers of security will be described and at the end, a quick summary will be given to help the reader get started in as little time as possible.
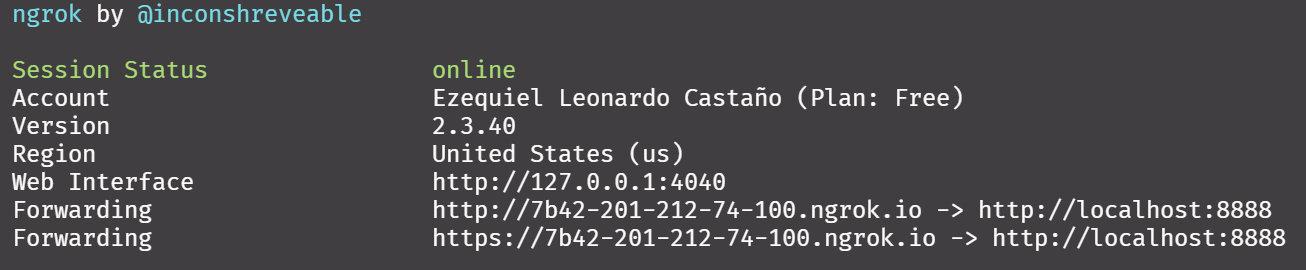
To set up an open connection to our computer, ngrok is a good solution. After installing it, and adding it to the Path, and providing the auth token, one can simply open connections in a single command:
ngrok http 8888
This command is enough to open the connection, and since our Jupyter environment is password-protected, there is no immediate threat. And this provides an additional layer of security out of the box: obscurity, which will be explained further in the next section.
However, if one navigates to the URL shown, a 403 Forbidden message will be displayed:
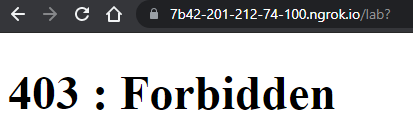
This is a security measure from Jupyter, it forbids all non-local connections:

To allow non-local connections the ServerApp.allow_remote_access should be
enabled. This can be done from the Jupyter Config file created with the
--generate-config command. Simply append this line to the end of the file:
c.ServerApp.allow_remote_access = True
Now after restarting the Jupyter instance, the URL provided by ngrok should be accessible:

Possible Error: Failed to complete tunnel connection
If a message like the following is shown:
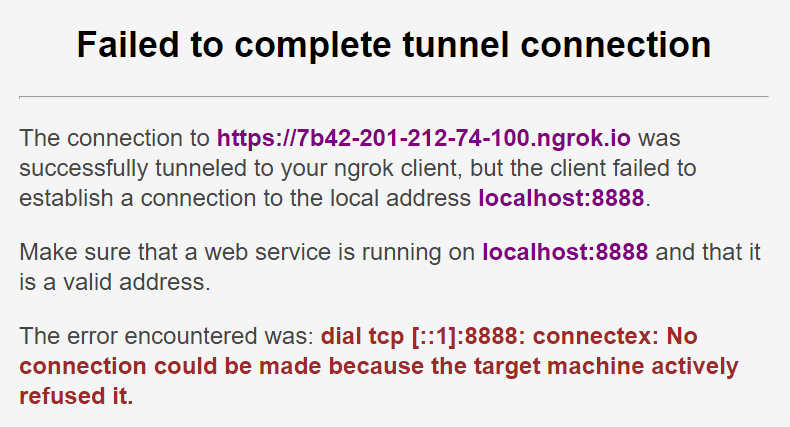
This means that there is no service running at port 8888. This means that Jupyter is either not running or is being served on another port.
Local Certificate
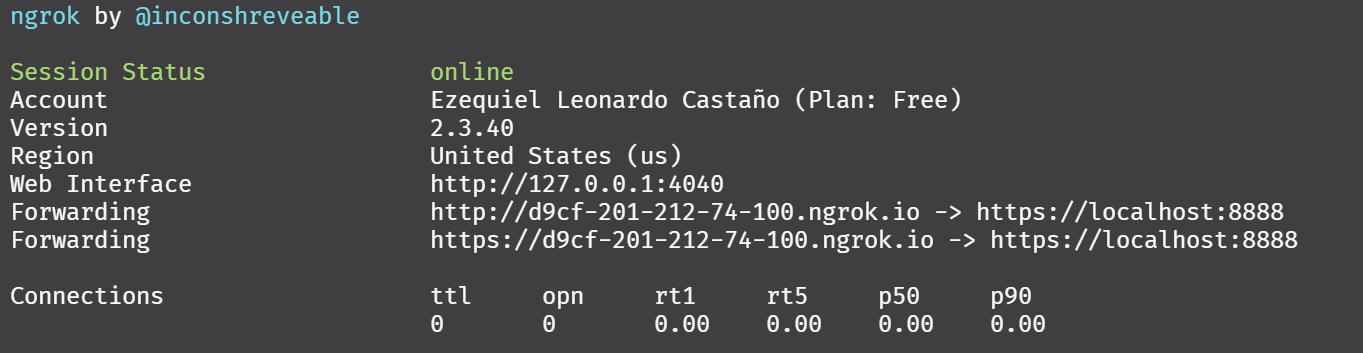
By default, when using a port as the destination, ngrok will point to the HTTP as in http://localhost. However, when using the second layer of security and implementing local TLS the above command should be rewritten to explicitly target https://localhost as follows:
ngrok http https://localhost:8888
This is an optional extra step, only needed when the local network is not trusted (e.g. public networks). This is mandatory when used in combination with the second layer of security described earlier.
Third Layer of Security: Obscurity

Ngrok will generate a pseudo-random sequence of characters for the URL of the connection. One might think this is a disadvantage or a limited feature of the free plan (since the paid plan support custom subdomains) but, having a hard-to-guess sequence at the beginning is similar to a password, since both parties should know it beforehand to establish the connection.
https://7b42-201-212-74-100.ngrok.io
Another advantage of this approach is that if a given URL is compromised, one can simply re-run the ngrok command and get a new one with practically no downtime.
The clear disadvantage is that this method will impede any long-lasting communication mechanism with the involved users (e.g. email), and one should fall back on instant messaging methods (e.g. chats, calls, etc.). Nonetheless, if the computer running the Jupyter will be kept on for long periods (like a server), this drawback can be neglected.
That being said, obscurity on its own is not a robust security measure, it will not stand against deliberate malicious attacks but it constitutes a bare minimum layer of confidentiality.
When inspecting the console output, one can see that ngrok actually does two forwarding connections, one for the HTTP and the other for the HTTPS. For reasons already explained, if an encrypted connection is needed (as it is here because we will be sending credentials), the HTTPS should be enforced by rejecting any incoming non-HTTPS connections. Ngrok facilitates this with a simple flag as explained in the next section.
Fourth Layer of Security: Public TLS Encryption

The second layer of security introduced self-signed certificates for the connections inside the local network (LAN or VPN), ngrok supports TLS encryption with certificates coming from a Certificate Authority (CA) as part of the free plan. However, the default behavior is to allow both HTTP (without certificates) and HTTPS (with certificates).

To enforce the use of HTTPS simply run:
ngrok http -bind-tls=true 8888
The console output now shows only one forwarding connection from HTTPS and all attempts to connect to HTTP will be forwarded to HTTPS.

The main difference with the second layer of security is that ngrok uses a certificate coming from a CA and hence the browser displays no warning whatsoever, resulting in a smoother experience for the final user.
One limitation of the approach described so far is that the Jupyter password is set globally for the local PC, and in case it is compromised, it may be inconvenient to re-share the new password to all users. To mitigate this, it is possible to generate a per-session username and password. This procedure is explained in the next section.
Fifth Layer of Security: HTTP Password
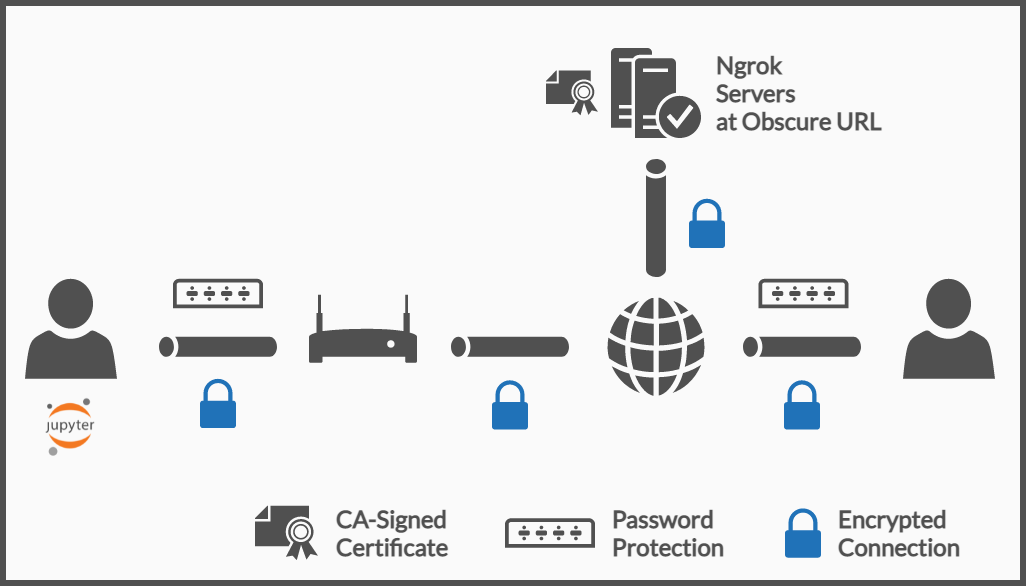
The HTTP protocol implements a basic authentication system via a username-password combination. These two fields travel as plain text unless the connection is encrypted (e.g. by using HTTPS), since the ngrok connection is already configured to only accept HTTPS, the username and password will travel through the internet encrypted.
The free plan of ngrok also includes support for this authentication method and
can be enabled by adding username:password to the command:
ngrok http -bind-tls=true -auth="any_username:sesion_password" 8888
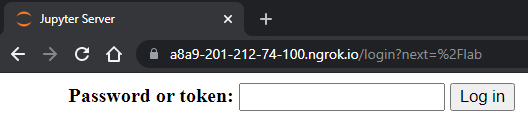
These credentials will be asked upon connecting to the ngrok URL
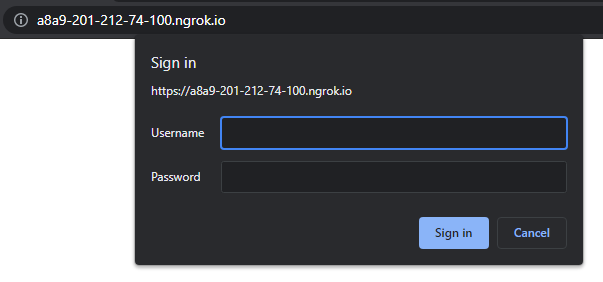
After introducing the correct credentials, the password for the Jupyter server will be asked.
This has an unintended advantage and that is that all attempts to log in are against Ngrok servers and not our Jupyter Server. Providing a somewhat basic defense against DDoS attacks.
With everything done up to this point, there are several layers of defenses. One of the things not done yet was filtering. There are several types of filters one can implement, being the most common IP and MAC filtering. In the next section, IP filtering is explained.
Sixth Layer of Security: IP Whitelist
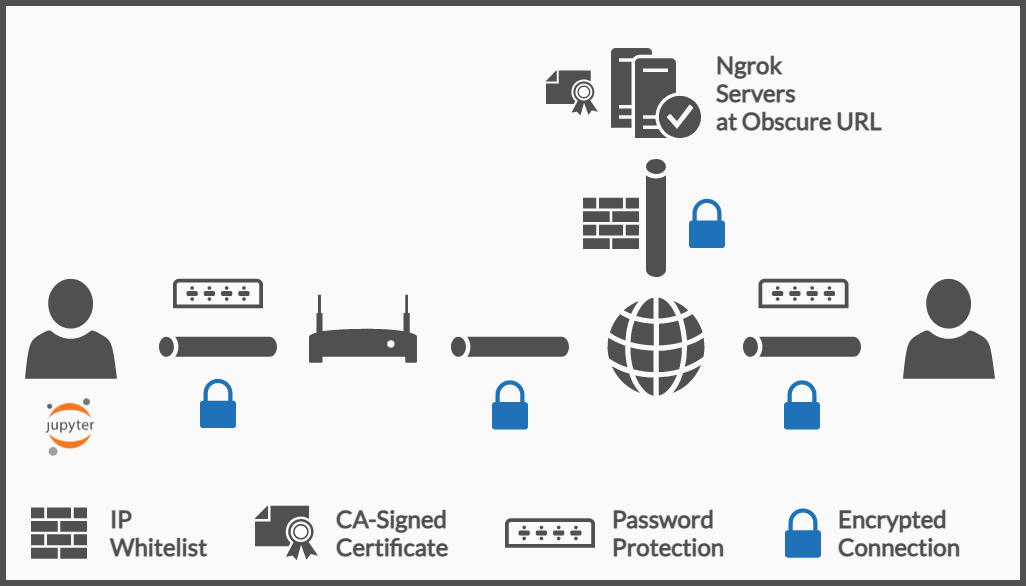
Ngrok provides an IP Whitelist feature, this is feature is only supported in the paid plans. Having the possibility to only allow certain IPs is useful as long as the users connecting have static IP addresses and they indeed know them.
The most common scenario is that a user does not know their IP address and even if they do it is hard to track when those are dynamically assigned (as it is with several ISPs).
In an enterprise setting, this is less convoluted since most PCs are connected through a VPN, and the VPN usually has a range of public IP addresses, thus whitelisting those makes the service only available for those in the company network.
For more information regarding this, check the official docs of ngrok.
This article has described some of the possible security measures one can take to securely connect to a Jupyter instance, the following sections will summarize the content showed in quick steps and finally, some pitfalls will be mentioned to avoid potential security risks.
Summary: Quick steps to follow
1. Update Jupyter Lab
Update Jupyter Lab to a 3.1.0 o newer with:
conda update anaconda
conda update jupyterlab
2. Set a Password
jupyter lab --generate-config
jupyter lab password
3. Enable non-local connections
Append this line to the config file generated in the previous step:
c.ServerApp.allow_remote_access = True
4. Run Ngrok
Run Ngrok with HTTPS only and providing username and password credentials
ngrok http -bind-tls=true -auth="any_username:sesion_password" 8888
To avoid manually writing this file every time, a config file can be used to automate the process. Steps to follow are shown in this video.
5. Share with users
Share the Jupyter password via a long-lasting communication mechanism (e.g. email), then share the ngrok URL and the associated username and password via some instant messaging (e.g. chat). For extra security use two different methods for the URL and the username-password, like sharing the username-password via a screen share and the URL via chat.
6. Work Together with Live Collaboration
Now everything is set up to work collaboratively.
7. Publish your work
Whenever the project is public, it is worth sharing. When working with Jupyter Notebooks there are several ways to do it. In this survey some of the most popular options are explained.
Common Pitfalls and Questions
Everything has been configured and now the environment has at least some basic security measures. However, there are some common pitfalls to be aware of.
Explicitly Ignore your sensitive files in source control
When using source control (e.g. git), the .pem and .key should be ignored
as well as any pre-configuration files from ngrok and jupyter. Otherwise, the
credentials and certificates are compromised.
Choose different and hard-to-crack Passwords
It is useless to use two passwords if those are not different from each other, good passwords are easy to read, easy to remember, and hard to guess. Against what might be popular on the internet, using phrases as passwords is quite useful and effective.
Since the Jupyter password will be applied to all sessions, it should be strong, preferably more than 16 characters long, whereas the Ngrok basic auth could be something longer than 10 characters.
To check password security by using some service online
Unreasonable Trust in ngrok
In this article, ngrok is assumed to be a trusted organization, however, there are no particular reasons one should trust ngrok. This post was not sponsored by them or any other company and using the approaches here described put an amount of trust in a free service some might find uncomfortable.
For the typical user of Jupyter Notebooks, it is unlikely that the weakest point in the security pipeline is ngrok but, for the conservative, security-driven users, this is something to carefully evaluate.
Ngrok will have access to the basic auth and for them, the Jupyter password will be visible so they will have backdoor access to your PC. However, to the best of the author's knowledge, there are no issues reported as security breaches from ngrok.
Another important point is that everything is built on the free plan from ngrok, should they change the scope of the features of the free plan, some part or all the procedure here describes might be obsolete. This is another potential risk, because there is no guarantee the free service will stay free as with the same features long-term.
Not suitable for unlimited connections
Even being generous, the free plan has its limitations and the collaboration features might be limited to a handful of users (probably not more than a couple of dozens). The free plan will likely fail to support hundreds of users as in live conferences, a MOOC, or similar events.
This approach is suitable for personal/hobbyist use or small teams (< 10 people). So far there are no benchmarks available as to how many users concurrently can be working using collaborative Jupyter Lab with ngrok.
Remember no system is 100% secure
This is an approach, it only showcases one possible way of doing things and there might be better and more secure ones. However, I consider this is a good tradeoff between technical complexity and practicality.
As mentioned at the beginning, I am not a security expert and it is up to you to double-check, all the information given and assess whether it is useful for your particular scenario.
Conclusion
The new collaborative feature of Jupyter Lab is out of beta and ready to be used. Some security measures should be taken beforehand to avoid any potential breaches or risks. After understanding the underlying concepts, the new Jupyter Lab can be run and set up in just 2 commands.
Contribute
This content is free and promotes both free and open source software, as well as monetary and intellectual accessibility. If you want to support it, please check out the privacy-first ad at the top of this page. Helping with fixing typos, suggesting edits, or leaving feedback in the comments is also valuable. If you like this content, please share it with others who might find it useful.
If you want to contribute financially, invite me a Ko-Fi or send me donation via PayPal. If you are in Argentina, you can invite me a Cafecito.